Webbing Loop Troubleshooting

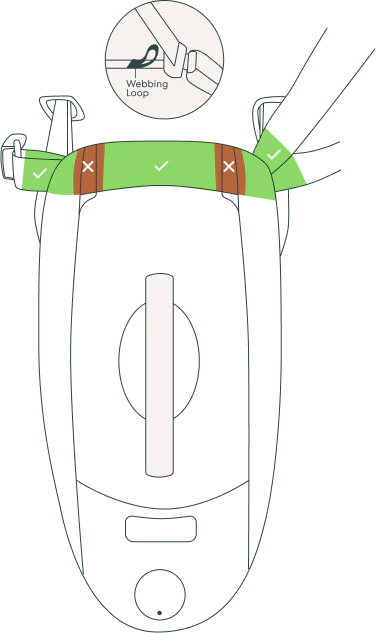
To check if the webbing loop on your vehicle seat belt is interfering with the tensioner on the babyark base (located at the belt path) – see illustration below.

If the loop is located in the middle or outside of the belt path (green areas) – there’s no issue and you can proceed with the installation process as shown in the app and user manual.
If the loop is located in the red area (under the tensioners) follow the instructions below to try to reposition the loop:
- Flip the loop away from the belt path so it’s no longer in the red area (under the tensioners)
- Shift the base on the lower anchor bar to reposition the loop * Or change the positioning of the rigid lower anchors in the seat bight If using the seat belt only rear-facing method.
- Try a different seating position
If none of these adjustments fix the positioning of the loop, you will need to use a belt shortening clip – please contact babyark to receive one free of charge. Only use the belt shortening clip provided to you by babyark. contact@babyark.com or at 1-888-9BABYARK
- If using the recommended installation - try the vehicle seat belt-only installation method to see if this eliminates the loop interference. You can use this installation method until you receive a belt shortening clip from babyark.
PLEASE NOTE: locking clips are not the same as belt shortening clips (even if they look similar). Only use an approved belt shortening clip provided by babyark.
Belt shortening clip instructions:
Once you receive the belt shortening clip, follow the written instructions below or watch the video demonstration done by our babyark CPST advocate - Britney. If you would like additional assistance, email Britney at britney@babyark.com to schedule a remote seat check.
- Grab the seat belt so that the loop is facing out toward the door of the vehicle and the metal part of the latch plate is facing toward the interior of the vehicle
- Move the latch plate up and out of the way and place your finger on the side of the vehicle seat belt facing the interior of the vehicle about 3” above the top of the loop
- Keeping your finger in that location, use your other hand to push the latch plate up about 6” and fold that part of the seat belt down (over your other finger) into a “seat belt sandwich” with the loop facing down toward the floor of the vehicle.
- Hold the seat belt sandwiched together. The hand holding the belt in the sandwich position will be closest to the bottom of the vehicle seat belt. The loop should still be facing down.
- Place the belt shortening clip under the “sandwich” near the hand that is holding the sandwich closed (about 3” below the bottom of the loop). Tuck both parts of the sandwiched seat belt under the first two metal fingers, over the center bar, and then under the second two metal fingers.
- Only the four metal fingers of the clip will be visible on the top of the sandwich. The center bar will be covered with seat belt webbing and the loop should still be facing down.
- Next, take just the top layer of the seat belt sandwich (near where you initially folded the belt over your finger) and pull it over the closest two metal fingers and then tuck it under the furthest two metal fingers.
- The belt shortening clip should now be inside the seat belt sandwich and there should only be two visible metal fingers.
- Route the seat belt through the belt path, buckle it on the other side, and continue the installation process as shown in the app and user manual. Make sure to lock the seat belt after activating the anti-rebound bar.
If you are not certain about your case or how to use the belt shortening clip, please contact us.


